Showing posts with label calaveras. Show all posts

Thursday, June 4, 2009

Oh how I love..... bracelet blanks

Hello.   I'm trying to get better at posting stuff.   For some reason I seem to want to work on stuff instead of write about.   Hey, i'm trying.   

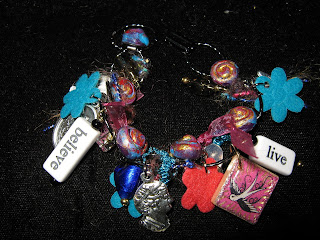
I've recently discovered something called "bracelet blanks".   I love them.  They are like a clean little slate waiting to be turned into a tiny, wearable work of art.   I had heard of them before, but was formally introduced to my new love on board the 2009 Craft Chica Cruise.  http://thecraftychica.blogspot.com/2009/04/4th-annual-crafty-chica-art-cruise.html
(Girl, you know i'm already on board for 2010!).   We made these bracelets by adding a little bit of everything.  (A littler bit here, even more there, oh, baby, don't stop!!)    

These next ones are some I did using scrabble tiles.  I got some great, digital scrabble tile sized images on Etsy.   For a great tutorial on how to prepare scrabble tiles see http://anniehoweskeepsakes.blogspot.com/2008/03/how-to-make-gorgeous-scrabble-tile.html
(Tiles in progress).


This last one I did with polymer clay.  I made little calaveras out of Sculpey Premo! and just glued them onto the bracelet blank.  Voila!    I have a few more ideas.  I'll post them when I finish.   
Additional tips:   I always use E6000 when gluing something to the bracelet.   Always score the metal disk that you are gluing your object to.   I use an exacto and just scratch it up a bit.  This helps with adhesion.   To get bracelet blanks go to http://shop.ringsthings.com/cart/pc/viewPrd.asp?idcategory=887&idproduct=19073


Read more...

Thursday, October 16, 2008

Day of the Dead cards


I know it's been awhile, but these are busy times. 4 more major shows to go this year! Gotta start cranking out. This is the time when you forget that your doing this because you LOVE it. Gotta remember that! Anyways, i've been working on a lot of metal embossed Day of the Dead cards and thought I share a little.

First I embossed the tin and and then embedded the images. For some of the cards, i used the Crafty Chica Mojito paper images. For the others, I got a sheet of white DCWV glitter paper (from Michaels), cut out skull shapes, and then drew on the plain white glitter paper with colored Sharpies. It's that easy;  glitter paper and sharpies of all colors. Now time to mount them onto cards!


Read more...

Tuesday, September 2, 2008

Simple Shrine Frame Tutorial

This is a simple way to make a shrine out of recycled materials.  You simply take a box of some sort, cut a CD or other round object in half and then screw it on the top.   I love recycling!!!   Clean up the environment and save $.   How can you lose?   Besides, they look amazing!!   This tutorial is for the basic shrine shape.    What you do with it is up to you.   I will post a few tutorials on how to make shrine elements out of polymer clay, including skeletons, so stay tuned!  

What you will need:
  • a box of some sort  (I usually use hinged wooden boxes that I take apart.  This way you have two!!).   Make sure the box has some sort of lip on it.
  • CD, jar lid, or other round (found) object that will serve as the top of your shrine
  • tin snips
  • ruler
  • Sharpie
  • drill and drill bit (I use a 1/16" drill bit)
  • tiny screws (the size that usually comes with saw tooth picture hangers)
Step 1:   Aha, another victim!!  Choose your box and disassemble if necessary.  Remember to make sure that you choose a box with a lip on it; this is where you will be attaching your lid.   

Step 2:  Choose a round object that will become the top of your shrine.   Choose a CD, jar lid or other object.   You will be cutting this object in half, so make sure that the size of your round object, when cut in half, is smaller than the width of the top of your box.   Take your sharpie and ruler and draw a line through the middle of your round object.

Step 3:   Using your tin snips, cut the object in half.

Step 4:   Position the half of the lid (or CD) onto the top of your box, and taking your drill, drill a hole through both objects (the lid and the box).

Step 5:  Screw the lid to the box.   I attached this one after I applied the glitter.   Usually I attach it before decorating, this way the screws won't show.

Step 6:   Decorate your shrine and enjoy!!   Note:   I used Crafty Chica glitters on this one!!   (Available online at Amazon or at Select Michael's stores).   (Sorry I can't post the link, still working on that one).   Amazing colors!!

Read more...

Tuesday, August 26, 2008

Funky, five minute, flower pin tutorial

This is a super fast way to make fabulous, colorful pins.    (Or use these little beauties to embellish your other creations!!) 

What you will need:
  • silk flowers of various colors, shapes and sizes  
  • jumbo brads, 1" across (available at scrapbooking stores)
  • 1" round piece of chipboard
  • pin back
  • jewelry glue (E-6000 or clear liquid nails)
  • ephemera to decorate the front of the pin (bottlecaps, 1" images, broken jewelry, charms, small skulls or hearts)
Step 1:  Disassemble the silk flowers  (you will need flowers that have a hole in the middle when taken apart;  if there is no hole, you will need to make one using an 1/8" hole punch or a craft knife)


Step 2: Layer the flower pieces by placing them on top of each other.   I usually use four or five layers of different shapes and different color flowers.  


Step 3:  Thread your brad through the flower layers.  (Remember, your flowers each have a hole in the middle of them).  Line up the holes and thread the brad through.  


Step 4:   Using jewelry glue, glue your 1" piece of chipboard (or flat object of similar size) to the back of your pin.  The chipboard piece should be centered and cover the prongs of the brad.   (Here, I used a flat alphabet tin as the backing).


Step 5:  Embellish the front of your pin.  You can do this in several ways.  
  • Decopauge an image directly onto the top of the brad
  • Glue a bottle cap onto the top of the brad and then decorate the inside of the bottlecap
  • Glue bits of jewelry or charms onto the top of the brad
  • I make little polymer clay skulls that I like to glue onto the top of the bradDon't forget to use glitter glue to give the flower petals a little sparkle!

Step 6:  Using jewelry glue, glue the pin back onto the back of the pin. 

Enjoy!!
Read more...