Thursday, June 4, 2009

Oh how I love..... bracelet blanks

Hello.   I'm trying to get better at posting stuff.   For some reason I seem to want to work on stuff instead of write about.   Hey, i'm trying.   

I've recently discovered something called "bracelet blanks".   I love them.  They are like a clean little slate waiting to be turned into a tiny, wearable work of art.   I had heard of them before, but was formally introduced to my new love on board the 2009 Craft Chica Cruise.  http://thecraftychica.blogspot.com/2009/04/4th-annual-crafty-chica-art-cruise.html
(Girl, you know i'm already on board for 2010!).   We made these bracelets by adding a little bit of everything.  (A littler bit here, even more there, oh, baby, don't stop!!)    

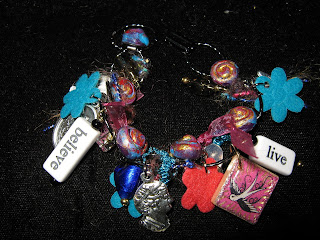
These next ones are some I did using scrabble tiles.  I got some great, digital scrabble tile sized images on Etsy.   For a great tutorial on how to prepare scrabble tiles see http://anniehoweskeepsakes.blogspot.com/2008/03/how-to-make-gorgeous-scrabble-tile.html
(Tiles in progress).


This last one I did with polymer clay.  I made little calaveras out of Sculpey Premo! and just glued them onto the bracelet blank.  Voila!    I have a few more ideas.  I'll post them when I finish.   
Additional tips:   I always use E6000 when gluing something to the bracelet.   Always score the metal disk that you are gluing your object to.   I use an exacto and just scratch it up a bit.  This helps with adhesion.   To get bracelet blanks go to http://shop.ringsthings.com/cart/pc/viewPrd.asp?idcategory=887&idproduct=19073


Read more...

Thursday, May 7, 2009

Great resin substitute!!

Hello. Sorry It's been so long. So much going on all the time. But I ran across this product and it is so amazing that I had to share. It is a great substitute for your two part resins. It's called Magic-Glos by Lisa Pavelka.  http://www.lisapavelka.com/Magic-Glos.asp  

I make a lot of jewelry, bottle-caps, scrabble tiles, dominoes, etc... I usually glue an image to the scrabble tile, coat it with several layers of sealer and then apply a two-part resin to it to make it super shiny. I use Enviro-tex. It is messy, smelly and takes a super long time to cure. But the results are amazing. I've tried several different products trying to get the same results I get using the resin. I've tried UTEE. With UTEE I usually get an uneven surface with part of the product either scorched or full of air bubbles. I also have to apply several coats to give it any depth. I've also tried Diamond Glaze. Still, it gives me no dimension and I have to apply several coats. I also tried to drill through both the UTEE and the Diamond Glaze and they both ended up cracking.

I tried this stuff (Magic-Glos) today. A little (well a lot) skeptical about the claims. It is supposed to be a great substitute for resin. I tried it and I love it. It is super shiny, super thick, super tough. You can drill it, it cures in 15 minutes in direct sunlight; no mess, no smell, no mixing. It creates a great "domed" effect on the top of the tiles. Did I say it cures in 15 minutes (or less)? You squirt it directly from the bottle!! Anyways, I found this great review, which I agree with 100% Check it out and let me know what you think. http://www.crafttestdummies.com/2008/09/15/craft-product-review-magic-glos-by-lisa-pavelka


p.s. I'll try to get better at this blog thing :) Read more...

Tuesday, November 11, 2008

Christmas ornaments made of wooden spools


Sorry it's been so long. I usually do a few shows a year: selling my goods and making a little $. Somehow this year I am busier than ever. I've already done two major shows and have 6 left to go, all before Christmas. Yikes, what have I done to myself. Anyways, I'll try to get a few more projects up before Christmas. And if anyone has any they would like to post here, let me know.


I whipped these up for a show in Tucson this weekend. They are made of wooden spools, bottle caps, beads, paint, varnish, wire, images, and a few embellishments. (I got the spools at Hobby Lobby). You can go crazy on these little babies!! Do a miniature version as a pendant!!


Gotta get back to work!
Read more...

Thursday, October 16, 2008

Day of the Dead cards


I know it's been awhile, but these are busy times. 4 more major shows to go this year! Gotta start cranking out. This is the time when you forget that your doing this because you LOVE it. Gotta remember that! Anyways, i've been working on a lot of metal embossed Day of the Dead cards and thought I share a little.

First I embossed the tin and and then embedded the images. For some of the cards, i used the Crafty Chica Mojito paper images. For the others, I got a sheet of white DCWV glitter paper (from Michaels), cut out skull shapes, and then drew on the plain white glitter paper with colored Sharpies. It's that easy;  glitter paper and sharpies of all colors. Now time to mount them onto cards!


Read more...

Monday, September 29, 2008

Shrines made from boats!! That's right, boats!!

Lately, for some reason everything I see looks like a shrine. Maybe it's because i've been gearing up for a Day of the Dead show or maybe i'm just crazy. Anyways, i've decided that boats, you know, the ones that look like they've been cut in half, make great shrines.


I found these at Dollar Tree. The frame had a little anchor on the bottom corner. (I already pried that little baby off with a screw driver).


I sanded it, painted it black, embossed some tin and then glued it on. Decorate the photo insert (here I used Crafty Chica loteria cards) or just insert a photo and your done!


This next one is a boat frame I found at Hobby Lobby for about $6. It's pretty big and it even has a drawer!

I just painted it and then added my shrine fixins'.


Don't you just love Day of the Dead!!!
Read more...

Wednesday, September 17, 2008

Tacky Boa Dollar Tree Frames

I found these (tacky) frames at Dollar Tree and had to have them.  Only $1.   OOOHH, the possibilities.   I got them home and wondered what the heck I was thinking.   


I spiced them up a little and am pretty happy with the result.   (Now i'm wishing I had bought more!!)   First, I embossed a metal frame and glued it to the original frame.  Then I removed the insert for the picture, painted directly on it and added a Crafty Chica Loteria image to it.   Voila, i'm done.   


I only have about 6 more of these so I think my next step will be trying to make my own.  Try cutting up a boa and gluing it onto the outside edge of a regular, painted frame.  Another idea is to glue Mardi Gras beads around the edge.   Also, rather than embossing metal for the frame, decorate the frame any way you like and add a mirror instead.   OOOHHH, the possibilities!!

Let me know if you make anything using this technique.  I would love to post photos on this blog.


Read more...

Tuesday, September 2, 2008

Simple Shrine Frame Tutorial

This is a simple way to make a shrine out of recycled materials.  You simply take a box of some sort, cut a CD or other round object in half and then screw it on the top.   I love recycling!!!   Clean up the environment and save $.   How can you lose?   Besides, they look amazing!!   This tutorial is for the basic shrine shape.    What you do with it is up to you.   I will post a few tutorials on how to make shrine elements out of polymer clay, including skeletons, so stay tuned!  

What you will need:
  • a box of some sort  (I usually use hinged wooden boxes that I take apart.  This way you have two!!).   Make sure the box has some sort of lip on it.
  • CD, jar lid, or other round (found) object that will serve as the top of your shrine
  • tin snips
  • ruler
  • Sharpie
  • drill and drill bit (I use a 1/16" drill bit)
  • tiny screws (the size that usually comes with saw tooth picture hangers)
Step 1:   Aha, another victim!!  Choose your box and disassemble if necessary.  Remember to make sure that you choose a box with a lip on it; this is where you will be attaching your lid.   

Step 2:  Choose a round object that will become the top of your shrine.   Choose a CD, jar lid or other object.   You will be cutting this object in half, so make sure that the size of your round object, when cut in half, is smaller than the width of the top of your box.   Take your sharpie and ruler and draw a line through the middle of your round object.

Step 3:   Using your tin snips, cut the object in half.

Step 4:   Position the half of the lid (or CD) onto the top of your box, and taking your drill, drill a hole through both objects (the lid and the box).

Step 5:  Screw the lid to the box.   I attached this one after I applied the glitter.   Usually I attach it before decorating, this way the screws won't show.

Step 6:   Decorate your shrine and enjoy!!   Note:   I used Crafty Chica glitters on this one!!   (Available online at Amazon or at Select Michael's stores).   (Sorry I can't post the link, still working on that one).   Amazing colors!!

Read more...